Black Forest Cake (updated)
Black Forest is the quintessential childhood dessert that I’ve grown up eating and come to love so much. Growing up, we only had a couple of good bakeries in town and all of them had one thing in common- they all did an amazing Black Forest Cake! Every birthday, anniversary or celebration, we would get a simple Black Forest Cake and it would be the highlight of the party. So simple, and yet so good! Over the years, this classic cake has etched a special place in my heart and rightfully so- it’s absolutely delicious!
Whether you’ve grown up eating this or completely new to it, I can guarantee you’re gonna leave here happy. Chocolate & cherry is one of the sexiest flavour combinations by far so we are already off to a good start. Throw a little bit of cream in there, and we’ve got ourselves a partayyyy (not like that, you filthy mind! hehe)

For all the newbies here, what’s a Black Forest Cake?
Originated in Germany, typically a black forest cake is a chocolate sponge cake layered with whipped cream and sour cherries. BUT, here’s the most important element of the cake to be called black forest- the use of kirsch. Kirsch is THE defining element and if you don’t use kirsch, you can’t actually claim it to be a black forest cake. No, seriously, you can’t- it has protected status. But lucky for us, Kirsch never hurt anyone and it is actually super delicious and makes this cake what it is.
Now, let’s get to my favourite part…
#NerdAlert!
Okay there are three major components to the cake:
Chocolate sponge soaked with kirsch
Sour cherries in syrup
Whipped cream
Here’s the best part- they are actually all super simple and easy to prepare.
Chocolate sponge
What makes a simple dessert great? Nailing each individual component to the T. A great sponge is the starting point. I have used the genoise sponge method here where eggs and sugar are whisked together to a thick sabayon (ribbon stage) to provide aeration to the cake, instead of a chemical leavening agent. By doing so, you are left with a nice light sponge. However, to make this a little fail-proof for everybody, I have added a tiny bit of baking powder as a supporting cast. As all sponges go, fold your batter gently and as little as possible to avoid losing the air and volume you just spent time creating.
Once the cakes are baked and cooled down, we are going to soak the sponges in cherry-kirsch syrup for the authentic black forest flavour. Yum!
Sour cherries in syrup
This is important. Now, my earlier thoughts were that the store-bought cherries in syrup were the best choice for this cake. However, there has been recent shift in perspective after I made this bomb cherry compote from fresh cherries and damn it’s good! Full of flavour and taste exactly like the cherries in syrup you would buy from the stores, minus any nasties. You know exactly what’s going in it and far less sugar.
In saying that, if cherries are not in season for you at the moment (looking at all my Northern hemisphere friends), you can absolutely use the cherries in syrup from the supermarket. They’re still delicious and give a beautiful texture to the overall cake. You can also get the cherries in syrup with alcohol in them, they are extra delicious! However, make sure you try that before using them because we don’t want them to taste plain boozy. They should be sweet and sour.
Whipped cream
This is the final piece in the black forest cake puzzle. Good ol’ whipped cream. I have added a little bit of mascarpone to my recipe because in my opinion, the texture is a lot creamier, has more body and therefore is more stable when assembling the cake. Plus you know me, I love my mascarpone! :D
Best way to whip cream? Here’s how I do it.

Now we come to the fun part- assembly! Let’s assemble that beauty.
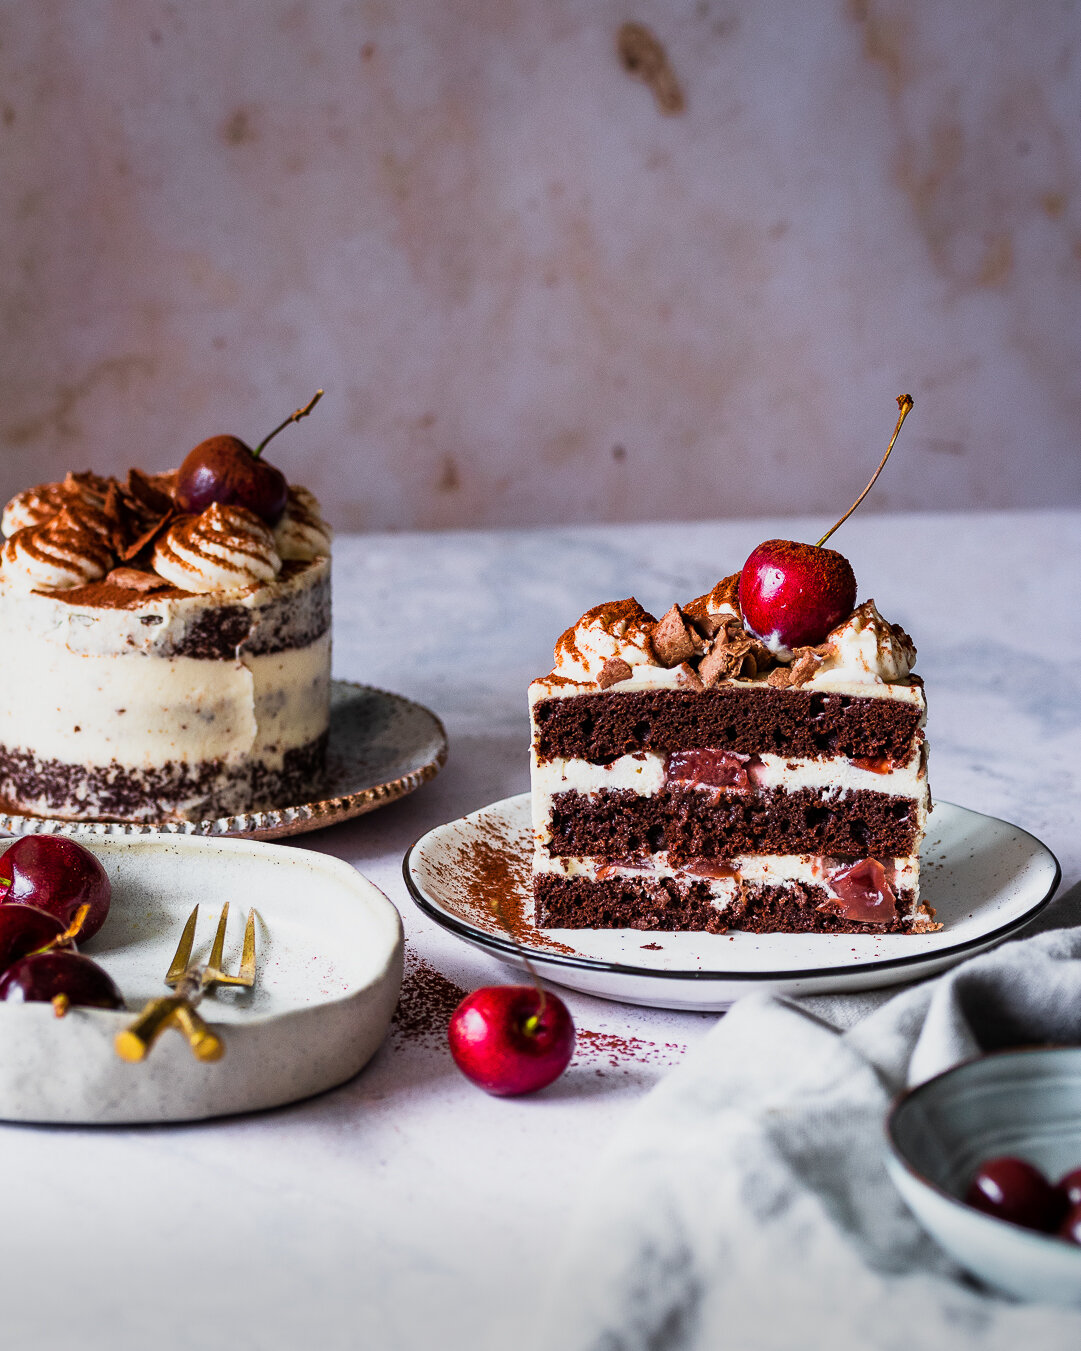
The basic assembly of the cake is pretty easy. It’s basically cake, soak, cream and cherry. But, here’s where it gets fun- you can decorate it however you like! I went for a naked style because I like the colour contrasts and the cheeky chocolate cake peeking through the white icing. I also wanted to add tempered chocolate flakes but it’s a super tiny cake and it looked too busy for this one. But if you’re making a bigger cake, go crazy with the chocolate flakes!
This is a small batch recipe so it is perfect for two! But if you’re looking to feed more people and spread the happiness, you can easily double or triple the recipe for a larger cake. More the merrier right? Perfect for any celebration or just a random Monday evening, you shall not be disappointed! Well, go on, get your aprons out and let’s get to it then? I hope this cake brings you as much joy as it did to me :) Happy baking folks! xx

Recipe
Serves: 2-4
Ingredients
For the chocolate sponge cake:
50g dark chocolate
50g unsalted butter, melted
4 large eggs
100g castor sugar
35g treacle/golden syrup
1 tsp vanilla extract
20g good quality dutch cocoa powder
115g plain flour
1.5 tsp baking powder
pinch of salt
For the cherry compote*:
200g fresh cherries, pitted (weighed after pitting them)
10g caster sugar
20g water
1/4 tsp tartaric or citric acid
15ml Amaretto
For the whipped cream:
250g heavy whipping cream/thickened cream/double cream
125g mascarpone
37g castor sugar
1 tbsp vanilla extract
For the assembly:
reserved cherry syrup (from the compote or jar cherries)
2 tbsp kirsch
dark chocolate for flakes
cocoa powder for dusting
Method
For the chocolate sponge cake:
Preheat oven to 195°C (deck oven) or 180°C (fan forced).
Grease and line a 12x9 inch baking tray with baking paper. Keep aside.
Melt the butter and chocolate together over a double boiler or microwave. Let it cool.
Weigh the plain flour, cocoa powder, baking powder and salt together in a bowl. Keep aside.
Using a stand mixer fitted with a whisk attachment, whisk the eggs, sugar, treacle syrup and vanilla extract together to a thick sabayon (ribbon stage)~fluffy and quadrupled in volume.
Sieve the dry ingredients over it and gently fold until almost combined.
Add the melted chocolate & butter and fold until combined, careful not to deflate the cake batter.
Pour the batter into the prepared baking tray and bake for 9-11 mins or until the cake springs back when pressed gently. Cool completely.
For the cherry compote:
Chop the cherries into quarters. You still want big chunks for texture.
In a small pot, add the chopped cherries, sugar and water and place over low-medium heat.
Cook the compote for 10-15 mins or until the cherries are soft but can still hold their shape. Stir occasionally to prevent it from sticking to the pot.
Remove from heat and allow to cool for 15 minutes.
Add the tartaric acid and Amaretto and stir to combine. Keep refrigerated until assembly.
For the whipped cream:
Put all the ingredients in the bowl of a stand mixer or use a handheld beater and whisk until soft-medium peaks. Transfer to a piping bag. Refrigerate until use.
Assembly:
Strain the cherry compote to reserve the cherry syrup.
Mix the reserved cherry syrup with kirsch.
Use a 9cm round cutter and cut 6 circles out of the cake. If you cannot get 6 full circles, cut 4 full circles and use the scraps to make up the 2 circles. (To make one big cake instead, use a 14cm cake ring.**)
To assemble the cake, brush the cake generously with the cherry-kirsch syrup. Spread a layer of whipped cream on top and arrange the cherry compote over the cream. (Tip: for best results, assemble the cake inside a cake ring.)
Repeat for another two layers. You should be left with three layers of cake, and two layers of cream & compote. If you have scrap circles, use that for the middle layer.
Pipe a thin layer of cream on top of the final layer of cake. Refrigerate for half an hour.
Remove the cake ring, if using. Use a palette knife and cover the cake with cream to create a naked cake effect. Pipe rosettes on top using a star shaped nozzle.
Make tempered chocolate flakes. Garnish the cake with chocolate flakes & fresh cherry and dust some cocoa powder. Store refrigerated until service. Bon appetite!
Notes:
*- If cherries are not in season for you, you can also use the store bought cherries in syrup. Strain the cherries and use the syrup to soak the cake with. Chop the cherries into halves before using.
**- You can also make one 14cm round cake with this recipe, instead of two smaller cakes. For a bigger cake, simply double the recipe.
If you enjoyed that and tried it at home, please tag me at @myyummyspatula on Instagram so that I can see all your bakes! For more BTS stories, updates and fun, you can follow along here:


