
Hazelnut Chocolate & Pear Cake
Its the last weekend of autumn here in Australia so I obviously HAD to share this recipe today! We’re going a bit fancy today- if you can call it that. It sure looks fancy but trust me, don’t be fooled by the outer demeanour- its actually SUPER easy to put together. Let me give you a fair warning though: this is just one of those really easy to eat cakes, especially after you have done ALL the hard work of actually making it. I personally love this cake for a couple of reasons:
The flavours work really well together. That additional coffee soak really takes it up a notch. Possibly one of my favourite flavour pairings!
It is super versatile in terms of adapting it to your flavour needs. For eg: if you’re not a pear person, you can choose to leave it out. The same with coffee. It is still going be amazing because hello! hazelnut & chocolate- match made in heaven! BUT, I would highly recommend making this as it is. Those poached pears really add a level of sophistication to the cake along with cutting through the heaviness of chocolate & hazelnut. Try it, and you wouldn’t ever go back!
The hazelnut sponge is the softest sponge you’ll eat! It’s light to eat but packed with so much flavour.
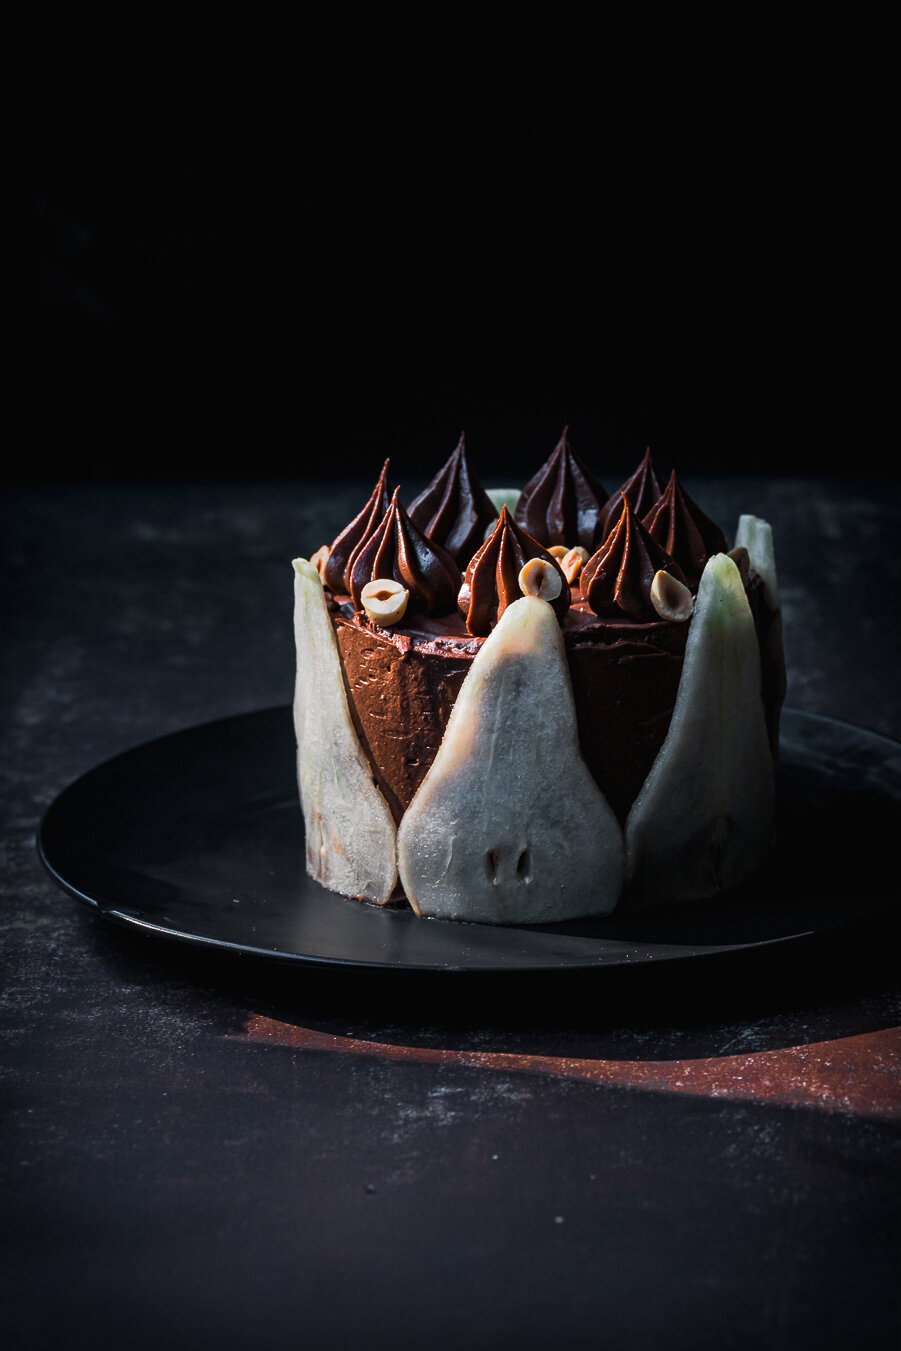
I mean, would you look at that! Kinda looks like a crown, hmm. Okay, let’s talk a little about what the hell is actually inside this beauty. There are three different components to this cake:
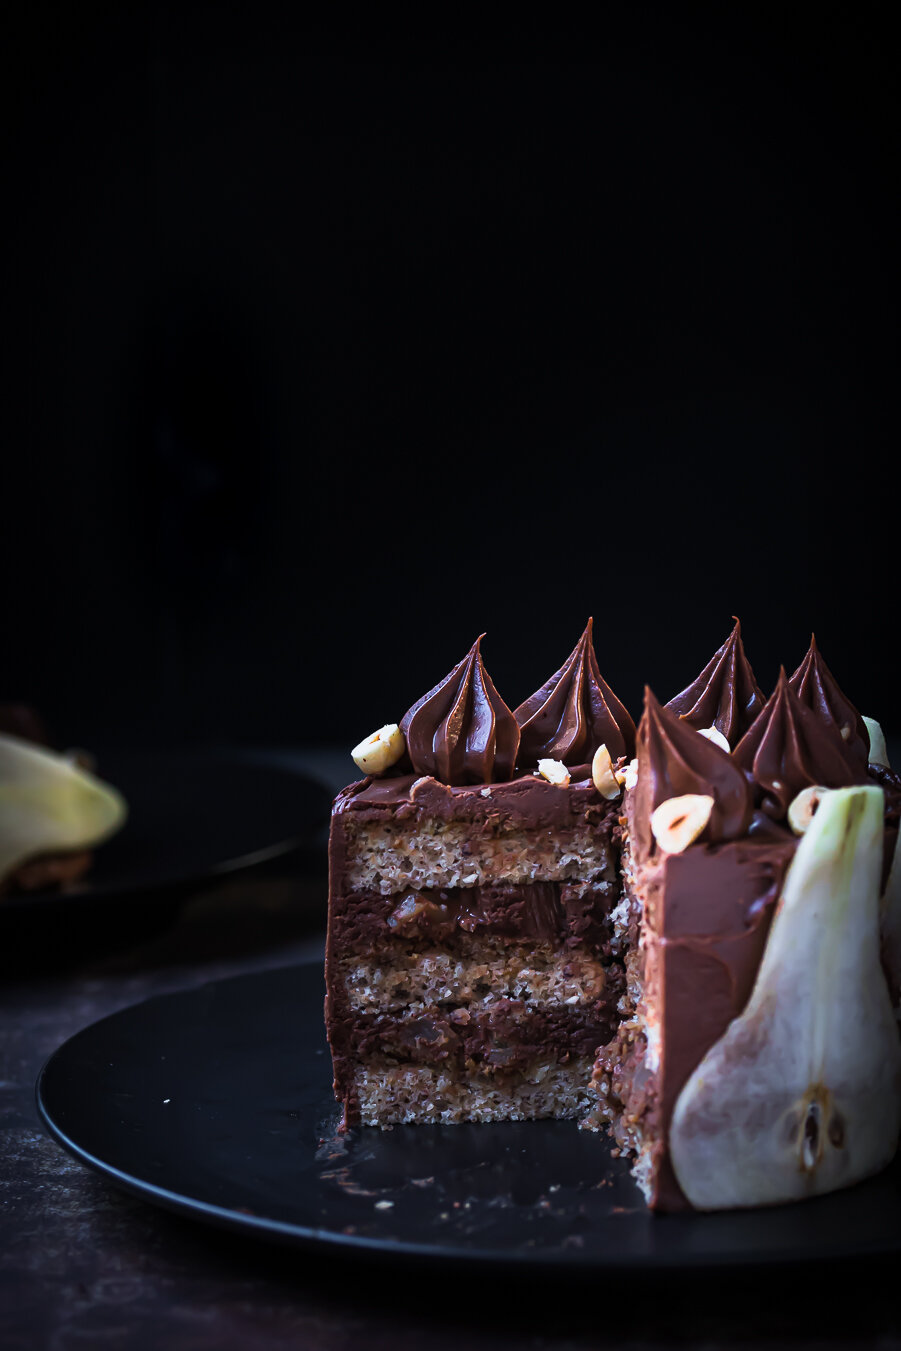
Hazelnut joconde: A joconde is basically a really light almond based sponge. Here I have used hazelnut meal instead for a hazelnut flavour. I personally love joconde because it is extremely light and soft to eat, quick and easy to make, and keeps really moist even after refrigeration. Nut based sponges are really flavourful and don’t taste eggy at all.
A coffee soak for the hazelnut sponge: This is simply coffee. No sugar syrup or anything. It is a really subtle flavour that runs through the cake but in my opinion, it kinda makes the cake really.
The most luscious chocolate cream cheese filling & frosting: This is stuff of your dreams. SO quick to make, and so so delicious! I could eat this stuff right out of the bowl. Plus I like how cream cheese adds a really subtle tang which prevents the cake from being too heavy to eat. This recipe is an adaptation from Sallys Baking Addiction.
Lastly, the poached pears: Now I understand that it can be a few different components to make for the cake so I have kept this poached pear recipe super simple. The pears are not poached whole, but rather diced and then poached. The difference? It is actually a lot easier to do it this way and takes the guesswork out of knowing when it’s done cooking, as can be the case with poaching them whole.

So in all honestly, it might seem like a lot happening, but if you look at it, each component is pretty straightforward and easy to follow. There’s honestly not a lot that can go wrong with this cake but here are my few cents on how to make this a 100% success for you:
Make sure to bake your joconde JUST right. If you under-bake your joconde, it will be quite sticky and can turn soggy. Alternatively, if you over bake it, it can turn into a crisp biscuit. This isn’t as bad since it will eventually soften with the moistness of the cream but you run the risk of breaking it while assembling. So just when it springs back, it is ready to go.
Have your ingredients at room temperature for the chocolate cream cheese frosting. If your cream cheese and butter is cold, they will not mix together properly and you’ll end up butter or cream cheese lumps in your frosting. We want our filling to be smooth and luscious. If you’re short on time, microwave the cream cheese and butter for a few seconds to bring it to room temperature!
This recipe makes for a small 12 cm cake. The sponge recipe is enough to give you slightly bigger cakes if you want.
This is the most important one: try not to eat all the frosting before finishing assembling the cake, ha!
Now that all that information is out of the way, lets get baking! This is the perfect cake if you wanna impress your family or friends or partners or whoever, without really having to slog all day in the kitchen. Hope you enjoy baking! xx

Recipe
Serves: 6 (12 cm cake)
Ingredients
For the hazelnut sponge cake:
188g icing sugar
188g hazelnut meal *
225g eggs (approx. 4-5 large eggs)
50g plain flour
38g unsalted butter, melted (can use salted too)
150g egg whites
25g castor sugar
For the chocolate cream cheese frosting:
340g cream cheese block, at room temperature **
175g unsalted butter, softened at room temperature
300g icing sugar
50g good quality cocoa powder
1 tbsp vanilla extract (1/2 tbsp, if using essence)
pinch of salt
For the poached pears:
1 large pear, peeled, cored and diced into 0.5 cm cubes
150 ml white wine (sub water if not using)
150ml water
200 g sugar
1/2 stick cinnamon
2 strips of lemon peel
1/2 vanilla bean
Assembly:
2 shots of espresso ***
handful of roasted hazelnuts, chopped
Method
For the hazelnut sponge cake:
Grease a 15x10 inch baking tray with butter and line with parchment paper. Preheat oven to 170 C (fan forced) or 180 C (conventional oven).
Using a stand mixer, start whipping egg whites until foamy. Add castor sugar gradually and whip to medium-stiff peaks. Alternatively, you can do this by hand after the nut mixture is ready.
Simultaneously, in a blender, blitz together the icing sugar and hazelnut meal to powder and until no sugar lumps remain. Transfer to a mixing bowl.
Add the whole eggs and whisk until light (approx. 2 mins).
Sift the plain flour into this mixture and mix until just combined.
Add the melted butter and mix.
Once the meringue is at medium-stiff peaks, gently fold the meringue into the nut mixture until just combined. Be careful to not over-mix so as to deflate the batter.
Pour the batter into the prepared baking tray and spread evenly.
Bake for 10-12 mins until lightly coloured and the cake springs back when lightly pressed with a finger. Let it cool completely.
For the chocolate cream cheese frosting:
In the bowl of a stand mixer using a paddle attachment or a hand held mixer, beat the cream until smooth and light.
Add the softened butter and beat until properly combined.
Sift the icing sugar and cocoa powder together.
Add the vanilla, sugar & cocoa powder mix and salt to the cream cheese-butter mix and beat until well combined and smooth.
Refrigerate for 10 mins.
For the poached pears:
In a medium saucepan, heat together the white wine, water and sugar until the sugar has melted.
Add the cinnamon stick, lemon peel, vanilla bean and the diced pears.
Bring to a boil and then reduce the heat to a simmer. Cook until the pears are soft but not mushy and still hold their shape (about 7-10 mins).
Cool completely in the saucepan. Refrigerate with the poaching liquid until needed.
Assembly:
Cut the sponge into circles using a 12 cm cake ring. Alternatively, you can also use a slightly larger ring, bearing in mind that you need 3 pieces of cake.
Drain the poached pears of the liquid.
Place one layer of cake on a plate. Using a pastry brush, soak the sponge lightly with coffee.
Spread a layer of chocolate frosting on top. Put a tablespoon or two of poached pears on top and spread it evenly.
Place another layer of cake on top and repeat the same until you have three layers of cake.
Put a layer of frosting on top without the pears this time.
Refrigerate for 20-30 mins.
Finish off the cake by masking the sides of the cake with frosting. Even out the top.
You can use a star nozzle to pipe the leftover chocolate cream on top. Sprinkle with roasted hazelnuts. Place pear slices on the sides of the cake. Alternatively, you can decorate as per you like.
Notes:
*- If you cannot find hazelnut meal, you can make your own by grinding equal quantity of skinned hazelnuts in a blender or food processor.
**- Use the cream cheese block variety for this recipe and not the spread.
***- You can make your own by mixing 1 tbsp of instant coffee powder with 50 ml of hot water.
If you enjoyed that and tried it at home, please tag me at @myyummyspatula on instagram so that I can see all your bakes! For more BTS stories, updates and fun, you can follow long here:


