
Japanese Milk Bread
This is my go to bread recipe. You’ll never go back to store bought bread after this, I promise! It’s fluffy and soft as a pillow, amazing slightly sweet buttery flavour and that gorgeous shiny crust! Do you know the best part? It’s eggless, effortless and makes for the BEST cheese toasties on the planet!! Ticks all your boxes? Yup, mine too!

What’s Japanese milk bread you ask? This bread is particularly characterised by its soft springy texture, and slightly sweet taste. As we all know, Japanese are the smart people. They are the OG when it comes to cooking techniques so no wonder this bread is one helluva kind. Most breads have a slightly crusty exterior and soft interior but they aren’t as fluffy and springy as this one. They also tend to dry out after a day or two. The secret to this particular bread is the use of Tangzhong aka a water roux. Tangzhong is basically a method of cooking water and flour together to a paste, that is then used to make the bread dough.
How does that help? Simply put, it does two things to our bread.
Making a water roux gelatinises the starch in the flour, which essentially means that it traps water (moisture) in this mix. As a result, when you bake your bread, the moisture doesn’t just evaporate but stays within, giving the bread the soft fluffy texture. This retained moisture allows the bread to remain soft even after a couple of days of baking.
Secondly, it helps to make your bread rise more. Tangzhong also acts as a conditioner for the bread dough. It helps to strength the gluten strands which means that they can now develop more to hold more gas during fermentation, resulting in a greater rise of the bread.
Well risen, soft fluffy bread- stuff of the dreams!

Tangzhong

How do breads work, what is gluten and why is it important to develop it?
There are two important elements here at play- gluten development and fermentation. The former is done at the very first stage when you’re making a bread dough. The more you knead it, the more gluten you’re developing. Fermentation is another beast that takes place after you’ve made your dough. This is the part where yeast wakes up from its nap and starts to play.
If you are a newbie to bread making and scratch your head every time you read ‘gluten development’, let me help you out. Gluten is a protein in flour that’s responsible for the strength and structure of your bread. The great characteristic of gluten is that when flour comes in contact with liquid, these gluten proteins are activated and they start to cosy up together, as and more you work the dough. The more you work it, the closer they get to form a tight structure called gluten strands. These strands add elasticity to the dough and thats why you can really stretch a bread dough before it starts to tear.
Again, how the hell does that help us RJ? Okay you’re with me so far right? Good. Now that we have tackled the gluten development part, why is it important?
Remember our friend, fermentation? Fermentation is a metabolic process that takes place with the help of an enzyme- our old mate yeast here. Very simply, yeast is pretty much like a human. So after we have made our dough, and yeast is woken from its nap, it starts to feed on the sugar present in the dough, and we have all heard of sugar high. So as it feeds on those sugars, the more active it gets, releasing carbon dioxide in the meanwhile. This carbon dioxide is what expands the dough and gives the bread its rise.
With me so far? This is the climax now.
So let’s introduce gluten strands to our pal carbon dioxide here. Stronger your gluten strands are, the more gas it can trap. The more gas it traps, the higher your bread will rise. You see now? Ahhh, now it makes sense! That wasn’t too bad, was it now?
So, here’s the thing. As long as you’re developing that gluten and getting that fermentation going, you’re on the right track. It must be your lucky day because I have a fail-proof way of telling when both are ready!
Window pane: In order to check if your dough is developed enough, cut a small piece of the dough and stretch it between your fingers as thin as you can without it tearing. If you can stretch it enough to a ‘window pane’ consistency where the dough is almost translucent, you’ve done a good job! Your dough is developed perfectly.
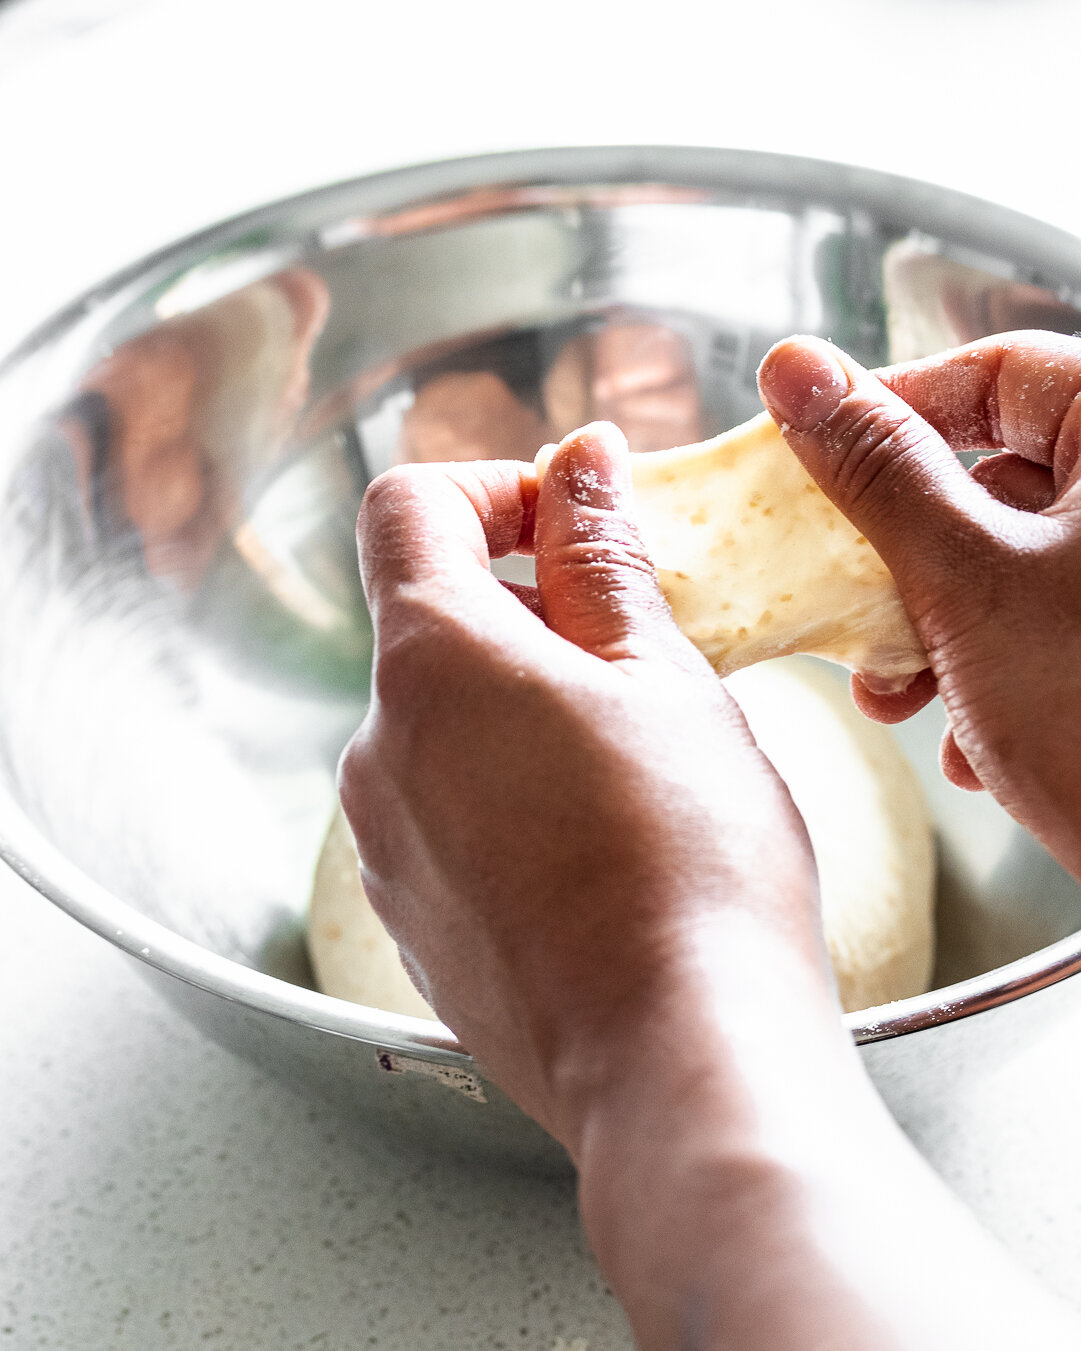
Window pane
Fermentation: Fermentation is a whole thing in itself but in regards with breads, it is easier to tell when your bread is fermented enough. For bulk fermenting or first proofing, you know the dough is ready when it has doubled in size. This is generally a good indication that you’re ready to move onto shaping. For the second proofing, usually your bread is ready to be baked when the dough has risen to the height of your baking tin. A little pro tip: like I said, yeast is like humans. It likes cosy temperatures- 25-27C is ideal.

Whew! That was a handful! I hope you understood the science behind bread making a little bit after reading that. I could go on about bread making for hours but we don’t have enough time for that. Hit me up on Instagram or email me and I would be happy to yap your ears off :P
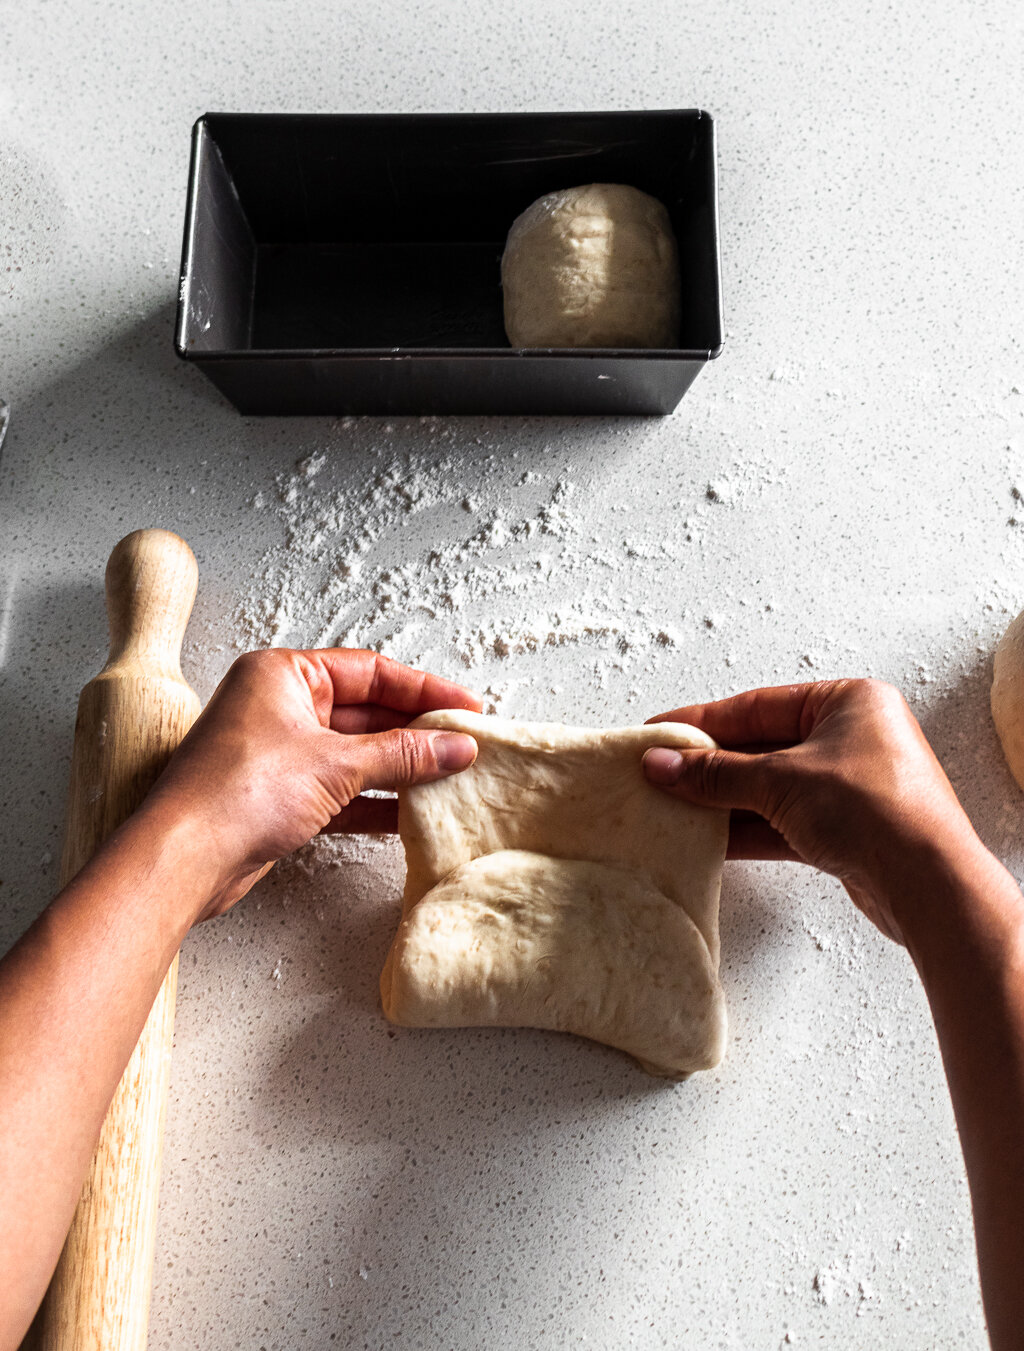
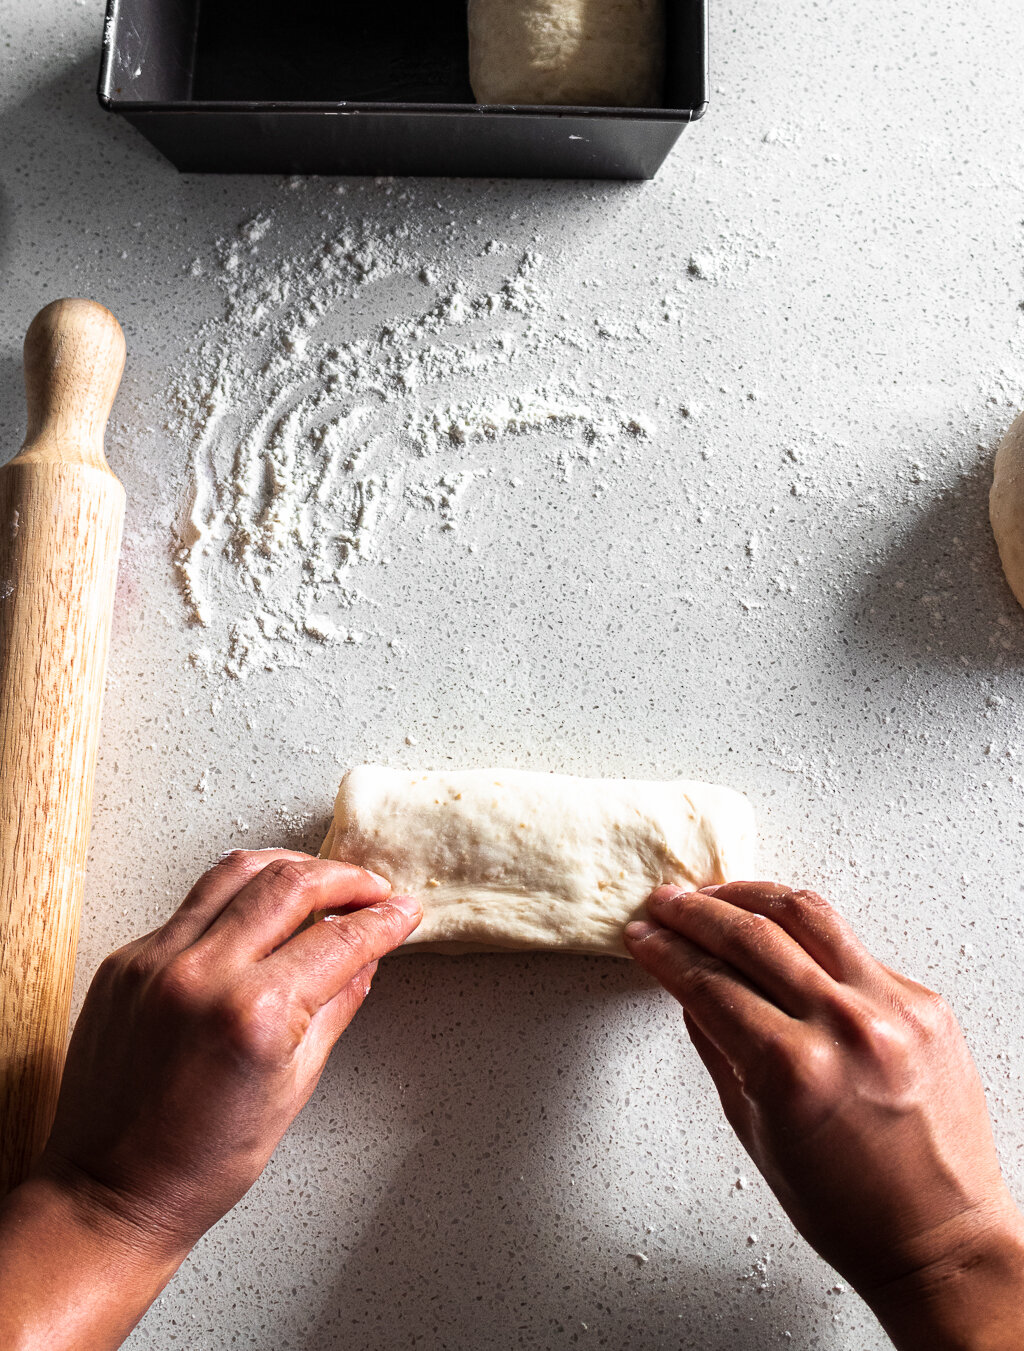
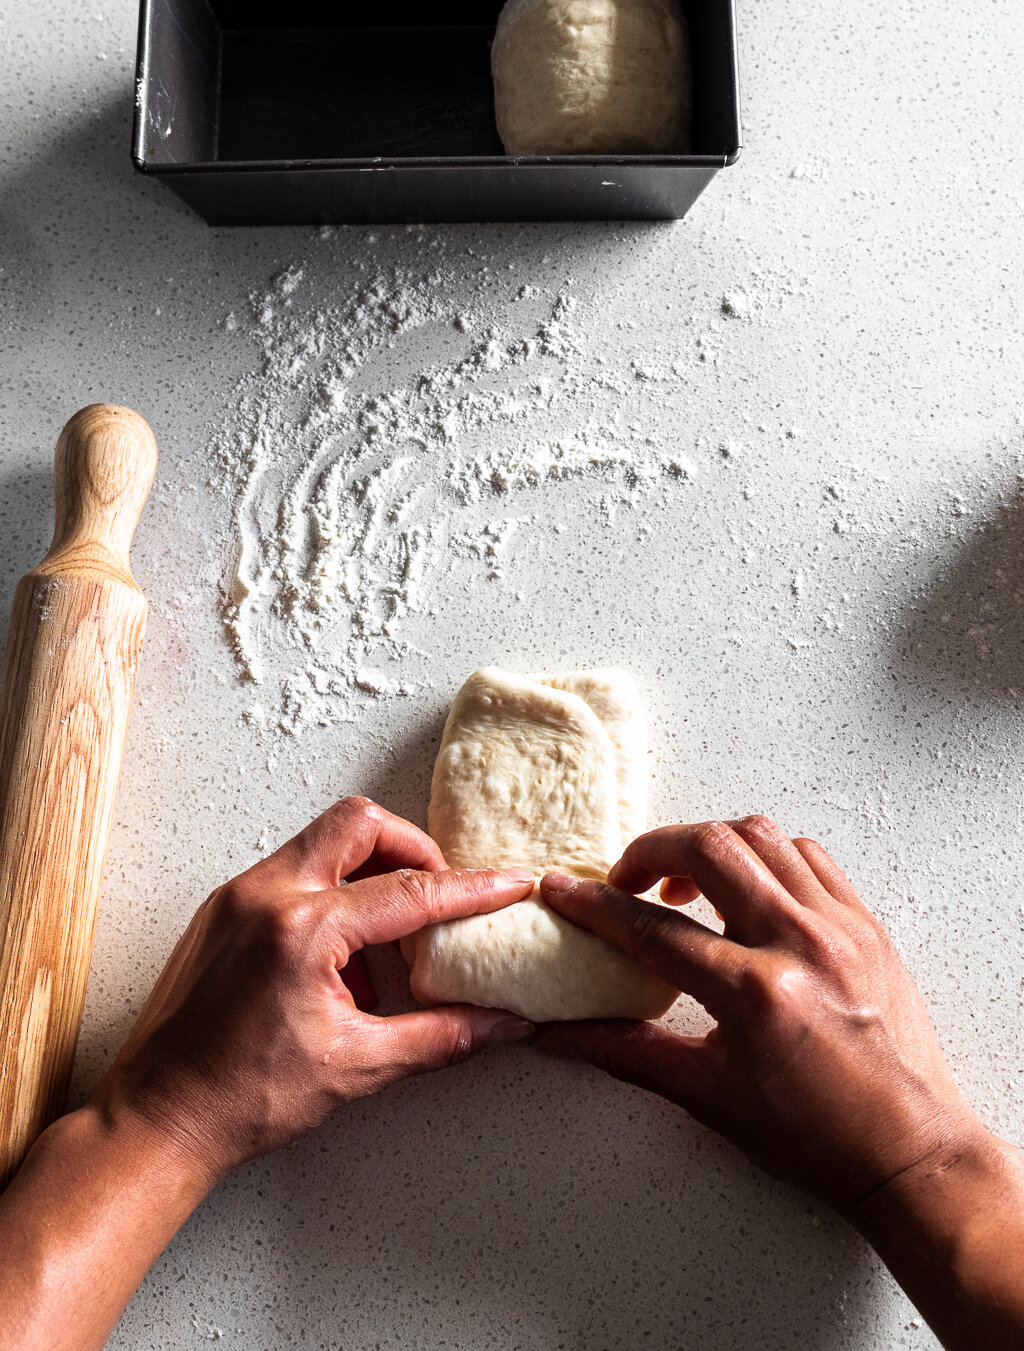
Let’s back to this bread. Here are a few step by step photos to help you understand visually the shaping process:

This is such an easy bread recipe that’s delicious with really soft fluffy interior. Give this a go and you’re never gonna look back. A great basic recipe to have in your collection, one that you’re going to keep coming back for. So bookmark this page if you have it. Let’s get right to it and in the kitchen. Happy baking folks!
Recipe
Serves: One 9” loaf
Ingredients
For tangzhong:
20g white bread flour
100g water
For the bread:
250g + 2 tbsp white bread flour
50g wholewheat flour
30g castor sugar
6g salt
5g yeast ~ 1 tsp
150ml full cream milk, at room temperature
tangzhong, from above
30g unsalted butter, cubed and at room temperature
1 egg yolk + splash of cream for egg wash (or sub milk for eggless version)
Method
For the tangzhong:
Mix the flour and water in a small saucepan and cook to a paste over medium heat, while whisking continuously. Cool to room temperature before using. *
For the bread:
In the bowl of a stand mixer, add all the ingredients for the bread except butter. Use a hook attachment and knead the dough on low-medium speed until it is no longer sticking to the sides of the bowl, about 10-15 mins. You can alternatively use your hands to knead but it will take longer.
Once the dough is no longer sticking to the sides of the mixing bowl, add in the butter, one cube at a time and continue kneading until all the butter is well incorporated, about 5-7 mins.
Check the dough for window pane consistency (see note above). If the dough tears before that, continue kneading for a couple of minutes longer.
Transfer the dough to a work surface. Knead it a couple of times by hand to smoothen the top and put it in a large bowl. Cover with cling wrap or beeswax wrap and let it proof at a warm spot for 1-1.5 hours or until doubled in size. **
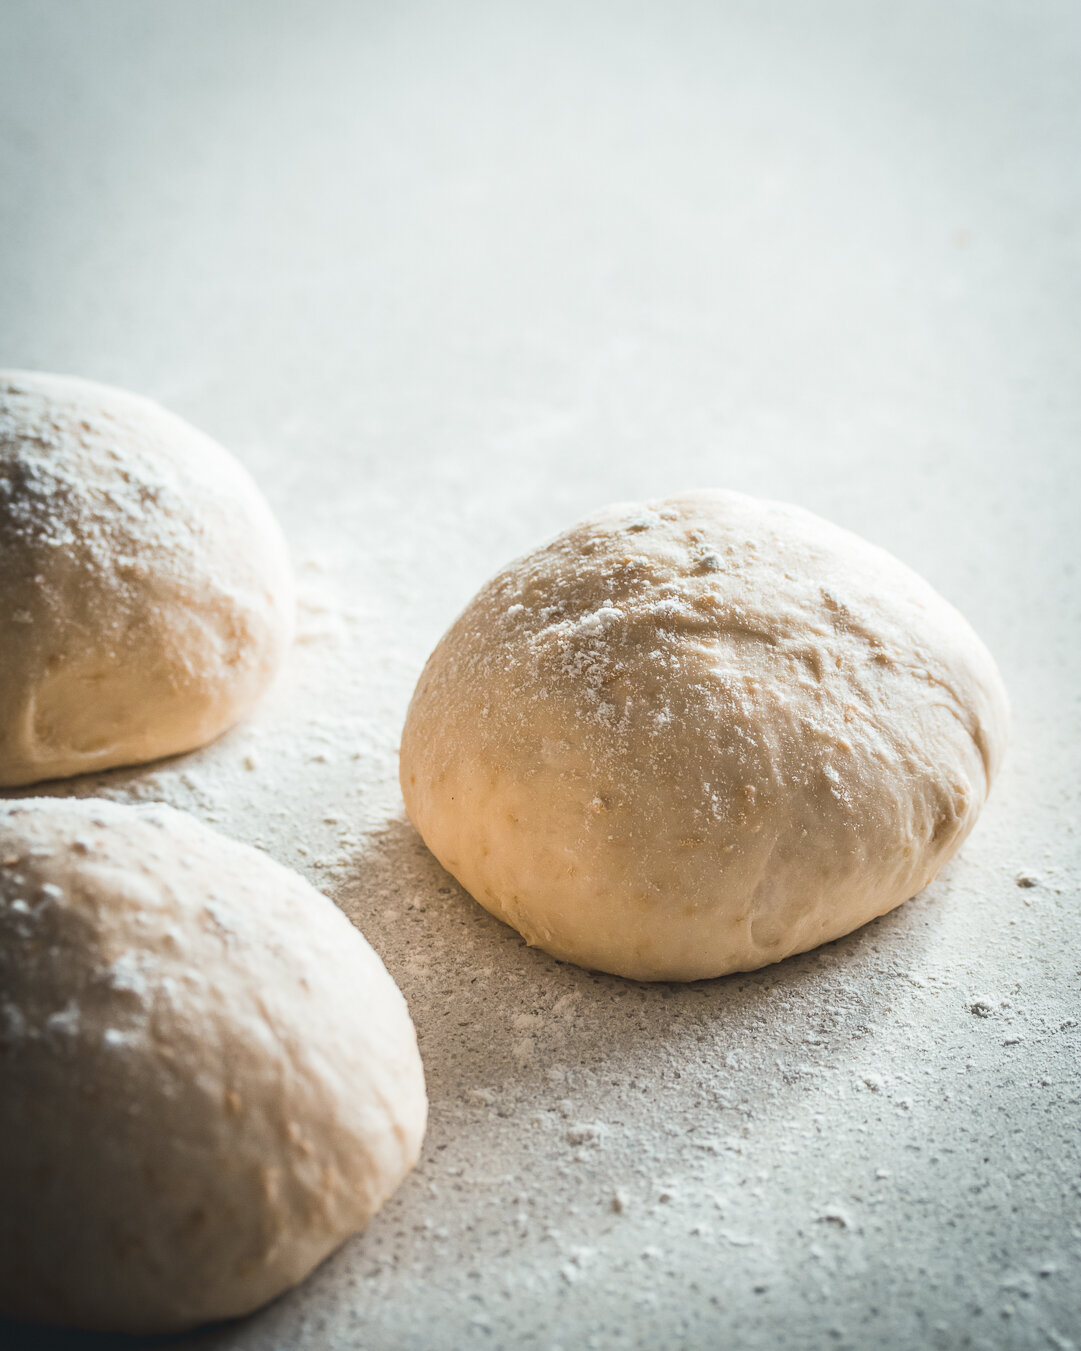
Once the dough has doubled in size, remove from the bowl onto a lightly floured work surface. Divide the dough into 3 equal parts and roll each part into individual balls. Cover with a tea towel and rest for 10 mins.
Lightly butter a 9” loaf tin. Keep aside.
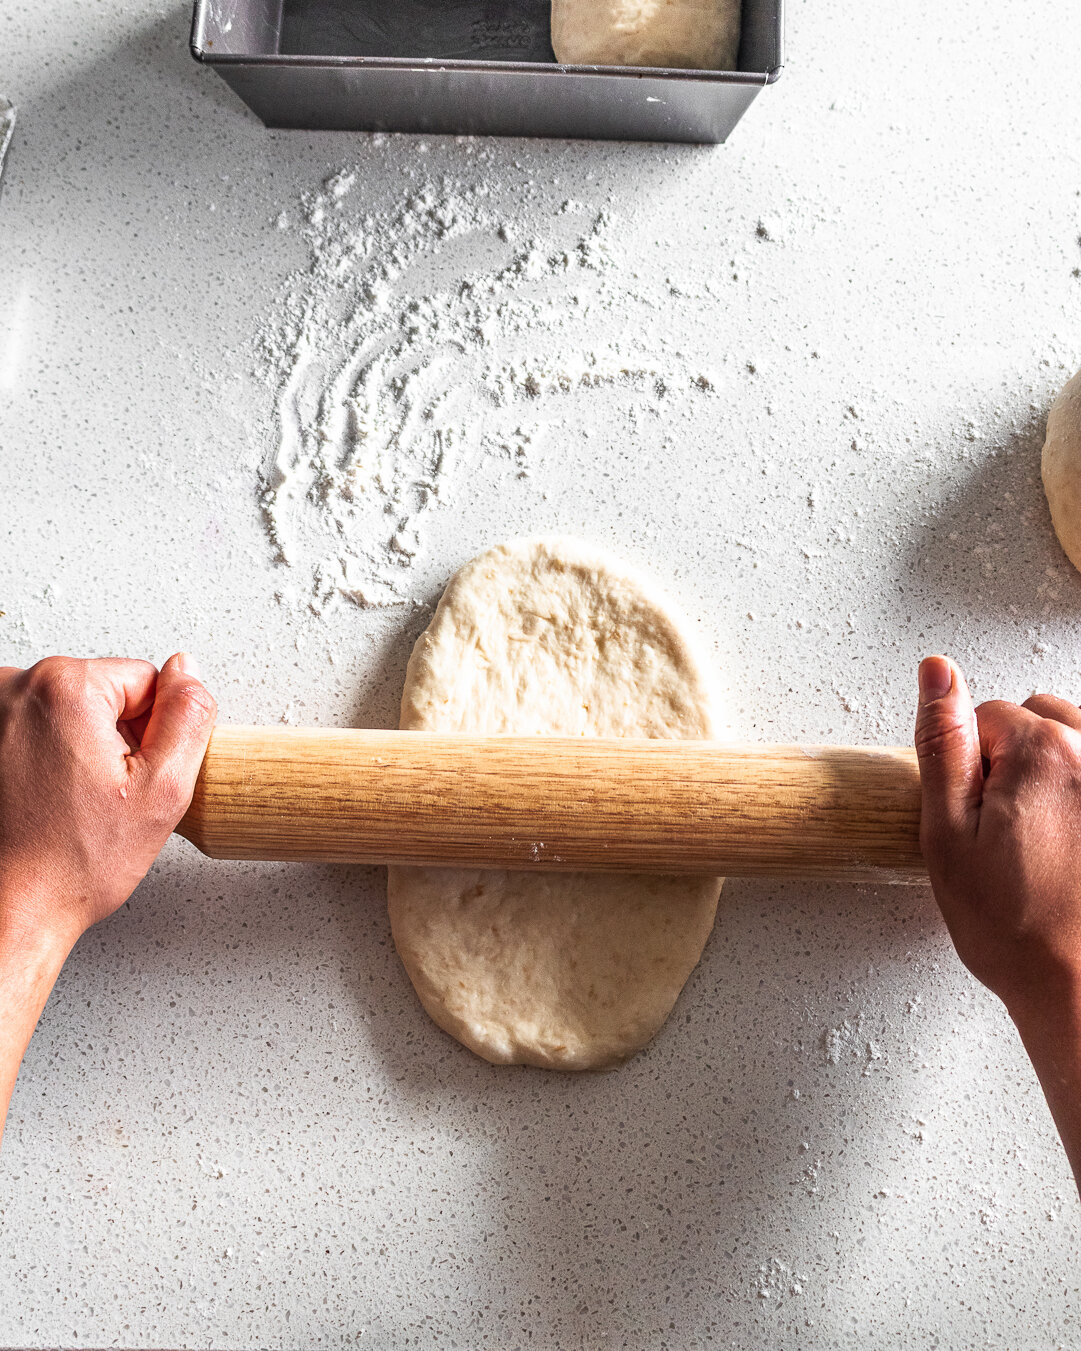
Take one ball at a time. Flatten the ball using the palm of your hands. Using a rolling pin, roll out the dough slightly.
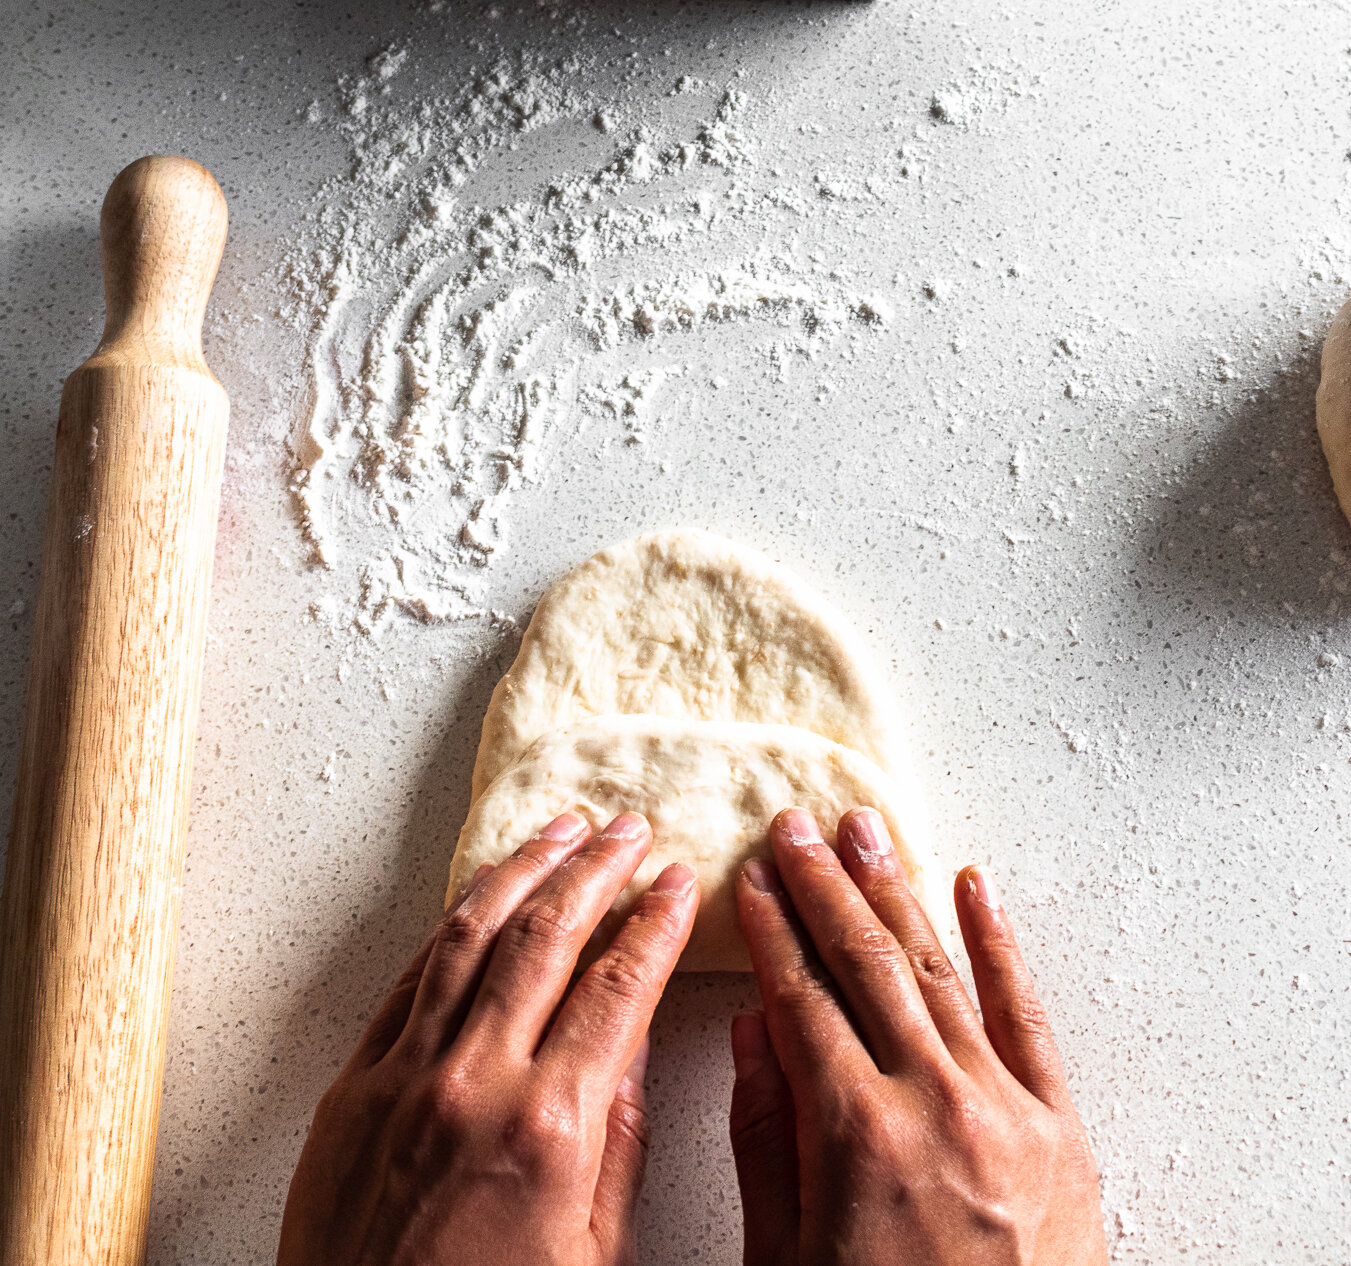
Hold the bottom edge of the dough and fold it one-third onto itself in the centre. Repeat the same with the top edge. This is called a single fold. (see images above)
Rotate the dough 90 degrees. Use a rolling pin and roll out the dough flat again. From bottom to top, start rolling the dough as if you’re rolling a cinnamon roll. Seal the edges tightly.
Place this in the buttered loaf tin in one corner. Repeat with the remaining balls. You should now have three rolls of dough in the bread tin.
Cover with cling wrap or beeswax wrap and let it proof at a warm spot for another 45 mins-1 hour or until the dough has risen to the height of the baking tin.
Preheat oven to 180C.
Mix the egg yolk with the cream and eggwash the bread. Use a milkwash for an eggless version.
Bake at 180C for 25 minutes. Carefully remove the bread from the tin and onto a cooling rack and let cool completely in an upright position.
Cut into slices and use. Bon appetite!
Notes:
*- You can cool it faster by placing it in the refrigerator for 30 minutes. However, make sure it is not cold when you use it.
**- The time of proofing will vary depending on your surrounding temperature. If it is too hot, the bread will prove faster and vice versa.
If you enjoyed that and tried it at home, please tag me at @myyummyspatula on Instagram so that I can see all your bakes! For more BTS stories, updates and fun, you can follow along here:


