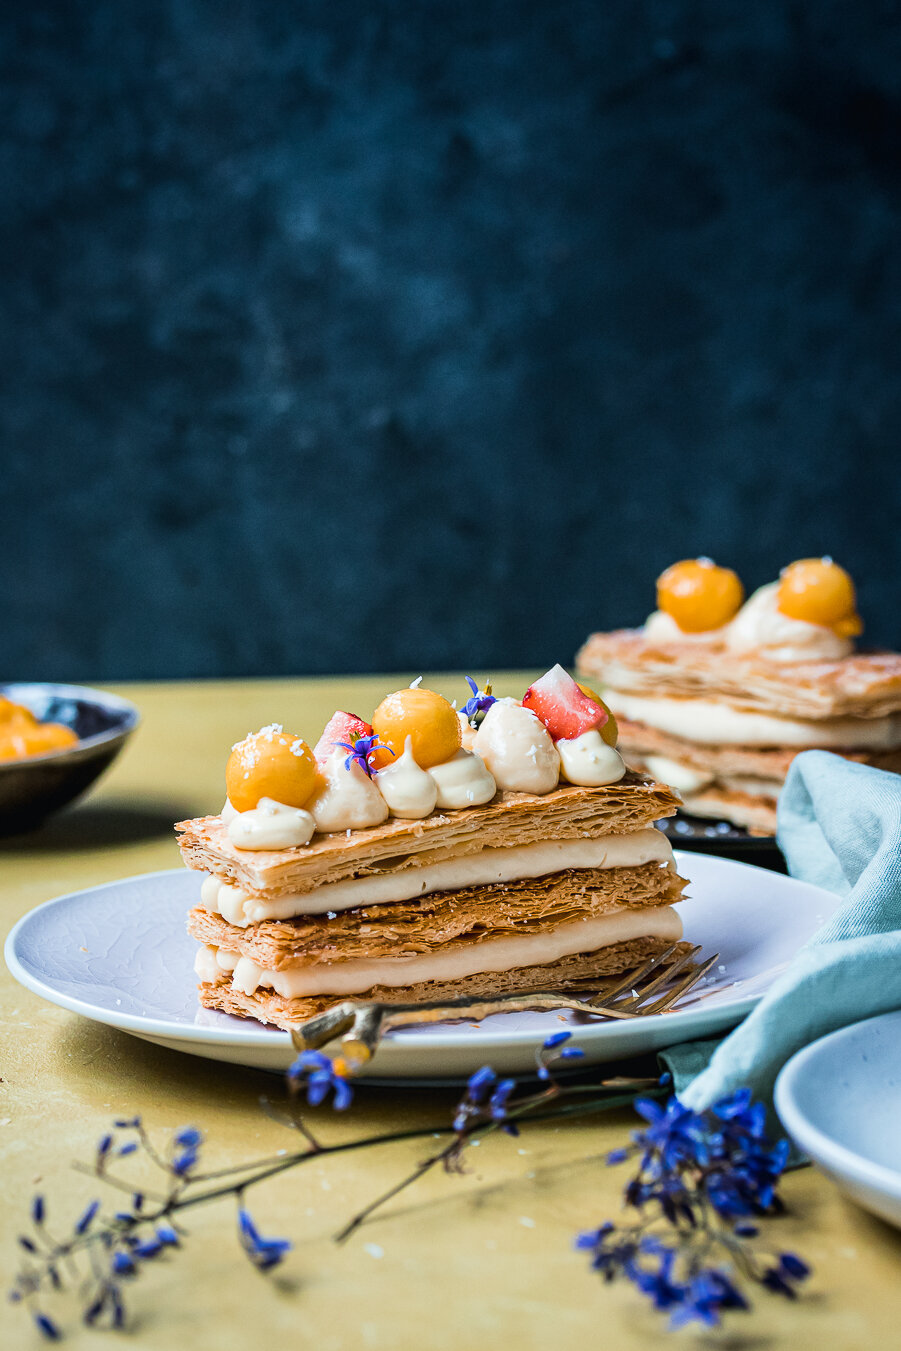
Mango & White Chocolate Mille Feuille
Hey you! Fancy seeing you here?
I guess you heard about the wonderful treat that awaits you. Well, in that case, you’re in the right place xx. Today’s recipe is an exciting one. We’re going to tackle the might Mille Feuille (pronounced as: mill-fa-yee). Hand’s up if you find this classic French dessert daunting? I did too! Until obviously I went to pastry school and learned how to make it and now make it everyday at work. Safe to say, I think I’ve picked up a thing or two. While it may seem quite daunting, let me tell you a secret- it really isn’t. No kidding, it’s actually pretty simple. Those layers are there to trick you. And well, to add majority of the goodness to the dessert but ya know what I mean. Nonetheless, I’m here to guide YOU so that you can be all fancy and recreate magic in your kitchens. Time to put on your French chef hats- let’s get this party started!
Before we get into it, for the purposes of easy writing and well reading, I’m gonna just call it Milf. This is what we call it at work and yes it is extremely hilarious (wink wink). So let’s break this down a little. A classic Milf has typically three components:
Caramelised puff pastry (flakey layers)
A vanilla creme diplomat (pastry cream folded with whipped cream)
A fondant icing on top with melted chocolate for the feather look
This one is pretty close to classic except we are changing up the flavours. And getting rid of that god awful fondant icing. Sorry if you’re a fondant lover. Honestly, pretty easy and straightforward. Caramelising the puff pastry is the biggest part of this recipe so let me run you through the process. I have also included a step by step photo guide for ease.
Caramelising puff pastry
I have used store bought puff pastry for this recipe because I didn’t wanna scare you away with making puff pastry from scratch. We will save that for another day.
Step 1: Defrost your puff pastry and dock it. First things first, line your baking tray with some parchment/baking paper. Place your puff pastry sheet on it and let it defrost for 10 mins (I’d say 10 mins on the counter top). You need minimum two baking trays of the same size for this. Use a fork to dock the puff pastry sheet very well (see image 1 & 2 for reference). Docking helps the pastry to rise evenly.
If your tray isn’t big enough to fit one sheet of 27x36 cm sheet, cut the sheet into half and use two trays instead.
Step 2: Sugar those pastries. Sugar is how we caramelise the pastry. Sprinkle a decent bit of castor sugar all over the pastry and just use your hands to spread it evenly. Now, don’t get too carried away. We want to cover our pastry but not make it swim in sugar (see images 3 & 4 for reference). Post some sugar love, we are gonna bake our puff (without any tray on top) at 180 C for roughly 25-30 mins or until it’s nicely golden brown on top (see image 5 for reference)
Step 3: Flip the pastry and compress those layers. Once it’s coloured and caramelised on top (image 5), we need to flip our pastry and bake further but this time, with a tray on top. To flip the pastry, first place another baking paper on top. Then hold the two edges of the bottom paper along with the pastry and the top paper, and then in a quick motion flip upside down. The bottom of the pastry is now on top (see image 6 for reference). It will be hot so either work quickly or wear oven mitts. Once you have flipped the pastry, place the second tray on top and lightly press down. Continue baking with the second tray on top for another 10-15 mins or until it’s nicely deep golden brown on top. We want a dark golden brown colour for extra flavour and flakeyness.
Step 4: Cut the puff pastry to desired size. Lastly, once the puff pastry is well caramelised, remove from the oven and let it cool before cutting it to avoid burning yourself. Once the pastry has cooled down, use a serrated knife a.k.a bread knife to cut it into 12 x4.5 cm rectangles. Be gentle while cutting so that you don’t break the delicate pastry. Only a serrated knife will cut the puff. Do not try cutting it with a chef’s knife or else you’ll end up breaking it (see images 7 & 8 for reference of final puff pastry).
Not too bad right? You’ll be fine, trust me. Just be confidence. You’ve got this.
Step by step process shots to caramelise puff pastry. Tap to enlarge.
Once you have got your puff caramelised, it’s pretty easy from there. We make our white chocolate pastry cream and mango lime curd and let them set. Once everything is set firm, we are ready to assemble. Always assemble your Milf to service. If you assemble it in advance, your pastry will get soggy and say goodbye to those buttery flakey layers that we all love so much. If you’re not quite sure about how to make pastry cream, I have a video tutorial for you if you want to watch it. You can watch the tutorial here.
This is such a light summery dessert even if it doesn’t look it. Trust me. The pastry cream is so smooth and velvety and is perfectly complemented by the light tangy mango lime curd. And it also ties together with the caramelised puff pastry. It’s a messy one to eat but boy, are you gonna be happy after eating this! :D This one is sure to impress you, I’m telling ya. And if you don’t take my word for it, try it for yourself and let me know what you think. Deal?
While I go get myself a cheeky Milf (ha, that’s funny!), I’m gonna let you keep drooling and get your aprons on. Happy baking and bon appetite! xx
Mango lime curd recipe adaptation from Room4Dessert by Will Goldfarb.


Recipe
Serves: 4
Ingredients
For the white chocolate pastry cream:
300 ml milk
1/2 vanilla bean
60g egg yolks
25g castor sugar
30g cornflour
30g unsalted butter
60g good quality white chocolate
For the mango lime curd:
200g mango puree *
20g lime juice
zest of 1/2 a lime
40g castor sugar
100g eggs
120g unsalted butter, at room temperature
For the caramelised puff pastry:
27x36cm sheet of good quality store-bought puff pastry, defrosted
castor sugar, roughly 1/3 cup
Method
For the white chocolate pastry cream:
Make the pastry cream first. Measure out the milk in a medium saucepan. Cut open the vanilla bean and scrape the beans into the milk. Add the vanilla pod to the milk as well. Place over medium heat to heat until just about boiling.
Meanwhile, prepare your slurry. In a mixing bowl, whisk the egg yolks and sugar together until combined. Add the cornflour and whisk again until everything is properly mixed together. Keep aside.
In a separate mixing bowl, weigh the white chocolate and the butter together. Keep aside.
Once the milk is just about to boil, temper the slurry with half of the hot milk and whisk until combined properly. Return this back into the remaining milk in the saucepan and over medium heat, cook out the pastry cream, whisking continuously, until well thickened and you can see significant bubbles.
After the pastry cream has thickened, remove from heat. Use a fine strainer and strain the pastry cream into the bowl with butter and white chocolate. Whisk until all the butter and chocolate has melted and everything is homogeneous.
Use a stick blender and emulsify the pastry cream until completely smooth.
Cover with cling wrap and place in the refrigerator to set until firm. For a video tutorial on how to make pastry cream, click here.
For the mango lime curd:
This is the easiest curd recipe you’ll ever find with the best results. In a small saucepan, mix the mango puree, lime juice and zest and the sugar together. Heat on medium heat until the sugar is completely dissolved.
Remove from heat and add in the eggs. Whisk to combine and return to the heat. Cook the curd to a gentle boil, whisking continuously.
Strain in a bowl and let it cool down slightly for about 5 mins.
Add the cubed butter and use a stick blender to emulsify, until all the butter is well incorporated. Cover with cling wrap and place in the refrigerator to set until firm.
For the caramelised puff pastry:
Refer to the post above for a more detailed step by step guide.
Preheat oven to 180 C.
Line a baking tray with some parchment/baking paper. Place the puff pastry sheet on it. Use a fork to dock the puff pastry sheet very well.
Sprinkle a decent bit of castor sugar all over the pastry and use your hands to spread it evenly.
Bake the puff (without any tray on top) for roughly 20-30 mins or until it’s nicely golden brown on top. I’d check at 20 mins.
Once the pastry has caramelised and coloured nicely, flip the pastry. To flip the pastry, first place another baking paper on top. Then hold the two edges of the bottom paper along with the pastry and the top paper, and then in a quick motion flip upside down. The bottom of the pastry is now on top.
After the pastry is flipped, place a second tray of the same size on top and lightly press down. Continue baking with the second tray on top for another 10-15 mins or until it’s nicely deep golden brown on top.
Once the puff pastry is well caramelised, remove from the oven and let it cool before cutting it to avoid burning yourself.
Use a serrated knife a.k.a bread knife to cut the pastry sheet into 12 x4.5 cm rectangles. Be gentle while cutting so that you don’t break the delicate pastry.
Store in an airtight container until use.
Assembly:
To assemble the mille feuille, pipe a little bit of pastry cream on a plate and place a caramelised puff pastry on top. Pipe an even layer of white chocolate pastry cream. On top of this, pipe a thin layer of the mango curd.
Place another puff pastry on top and repeat this process one more time, until you have three layers of puff and two layers of cream.
To garnish, pipe small dollops of pastry cream and curd on top. Garnish with fresh mango. Serve and enjoy!
Notes:
*- I use fresh mango and blend it to a puree. You can use store bought mango puree as well but be careful of the sweetness level as they have added sugar.
If you enjoyed that and tried it at home, please tag me at @myyummyspatula on Instagram so that I can see all your bakes! For more BTS stories, updates and fun, you can follow long here:


