
Baked NY style Passionfruit Cheesecake
This cheesecake is SO incredibly good that I literally cannot stop eating it! And no, that is not an exaggeration, by any means lol. I sneaked a slice just last night at 11.45PM (PM!!!) because I just coulddddn’t resist myself (faceplam)
This is a new feeling for me too because I’m not particularly crazy for cheesecakes. I mean yeah, they taste great & I’ll have a bite or two if somebody ordered it but I never crave one, you know? But this stuff has got me hooked! (Did I secretly drop some w%$d in it? Shhh, who knows :P) I’m kidddinggg, I didn’t. Just some good ol’ cream cheese, doing the trick ;)
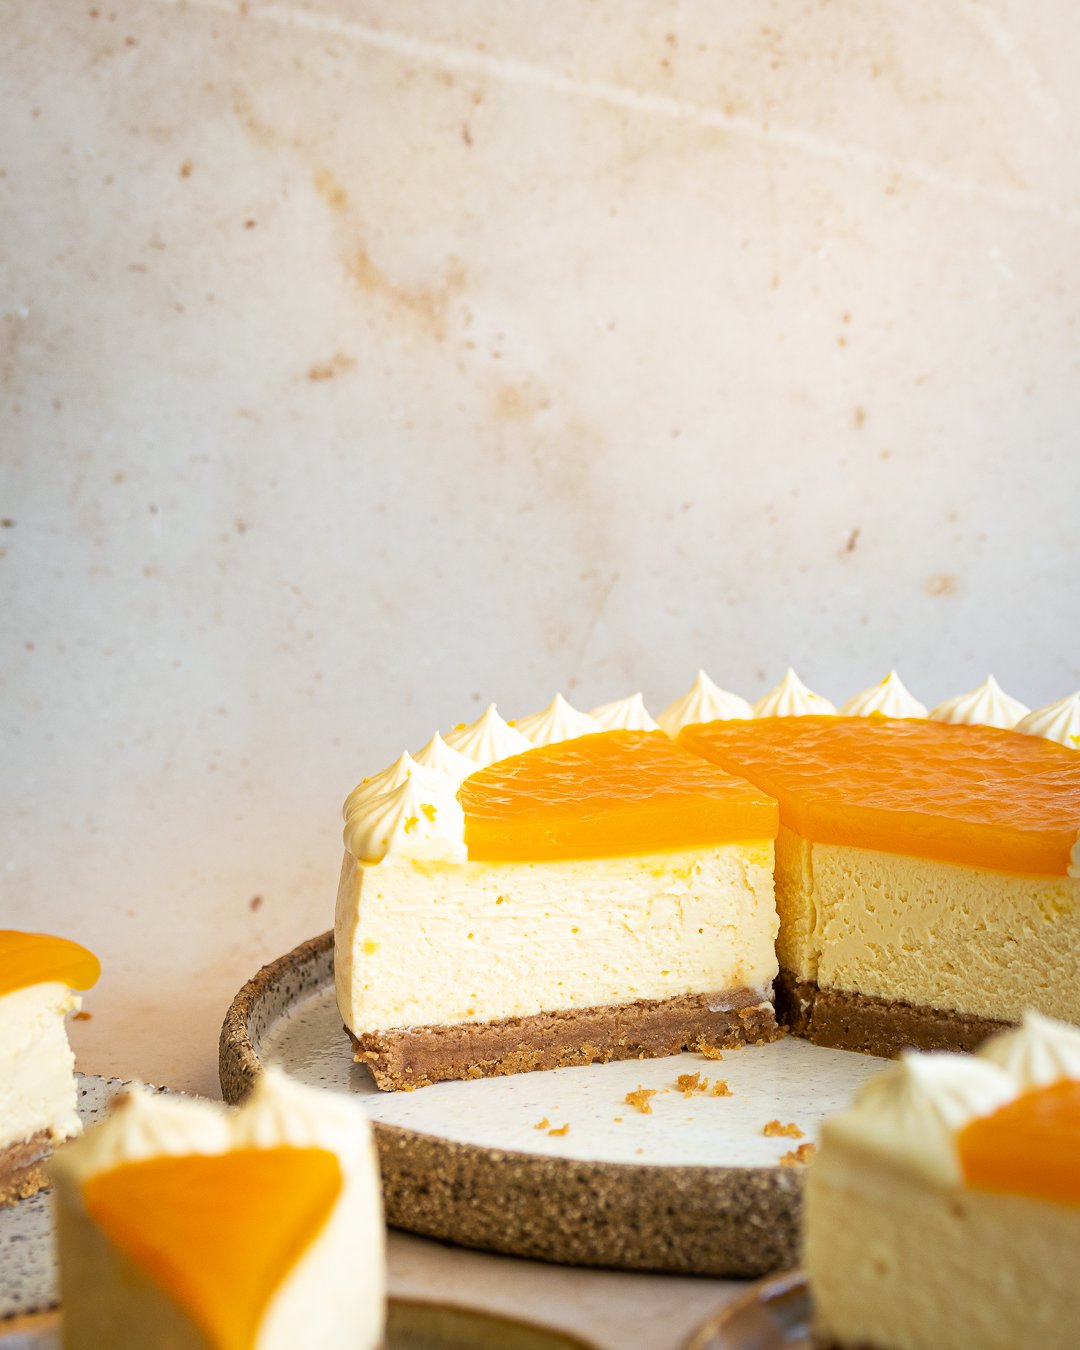
Okay I’m not going to give you reasons you need this in your life because just look at that…I mean just look it!! Do you even need reasons to make that? AND eat it? And if you do, I’m sorry I got no words for you. You probably don’t deserve to eat this…let’s just leave it at that..
Before we head to the recipe, let’s talk a little about this cheesecake though. First things first, what’s the difference between a NY style cheesecake vs a regular baked cheesecake?
Good question! A New York style cheesecake is more cream cheese intense, which means it tends to be richer & slightly heavier than it’s regular counterpart. However, because it’s richer and have more fat (thanks to more cream cheese), the texture is unbelievably smooth, very creamy & slightly more resilient to over baking & curdling. In other words, it’s frickin’ good!

How to get a perfectly smooth cheesecake?
As simple as cheesecakes are to make, there are a few things to keep in mind to ensure you get the most perfect, melt in your mouth, crack-free cheesecake that will knock everybody’s socks off! And I’m gonna tell you exactly how to achieve that.
Use room temperature ingredients, especially cream cheese. There is no way you’re gonna get a smooth cheesecake- both in texture & mouthfeel, if your cream cheese isn’t soft to begin with.
Why? Room temp cream cheese is softer, which means you can beat it easily to ensure it has no lumps (smooth texture). You also want a smooth emulsification of your cheesecake batter to give you a smooth texture after it’s baked. Emulsification is best at room temp. and does not happen if your ingredients are at different temperatures.
Plus, room temp ingredients trap more air while beating, meaning that your cheesecake will be a lot lighter and smooth in mouthfeel.
Too much air is not good. You want some air in your cheesecake to make it light and it doesn’t feel like you’re eating a block of cheese, but too much air is not ideal as it will leads to cracks in your cheesecakes on baking.
Take it low & slow. If you want a smooth, crack-free cheesecake, bake it at a low temperature for longer for gentle, even heating. When you bake your cheesecake at a low temp, it provides gentle heating, allowing for the air to evaporate nice & easy before the structure starts to set- giving you a crack-free cheesecake.
Use a water bath. Now a lot of people prefer to bake it at an extremely low temperature (roughly 90/100°C) without a water bath, for a lot longer to get a smooth, crack-free cheesecake. You can most certainly do that. Or use a water bath to speed things up. Water bath allows you to bake your cheesecake at a slightly higher temperature, while still maintaining gentle even heat as the water acts as an insulation for direct heat to the cheesecake.
Patience child. Patience is key to making a good cheesecake. Pretty much key to everything in baking. Allow your cheesecake to set overnight after it’s been baked for best texture and flavour.

Cool, now that you know how to make a kickass cheesecake, let’s talk flavour variation.
What if you don’t like passionfruit? Do you HAVE to make a passionfruit cheesecake? Absolutely not.
This is a very versatile recipe and you can change the flavours as per you like. If you want a neutral cheesecake, you can replace the passionfruit juice in the recipe for lemon juice. Then simply switch the jelly flavour to suit your flavour profile. You can make a mango jelly, peach jelly, lime, orange, raspberry, whatever the heck your heart desires. Don’t like jelly? Skip it! (Even though I really do recommend it to cut through the heaviness of the cheesecake)
A good dessert isn’t about piling sugar with sugar with sugar. You gotta balance it out. So add a little freshness to go with the heavy cheesecake for best palette experience.
And that’s how you get the most addictive, delicious, knock it out of the park cheesecake! Get your aprons out and let’s get you baking right away :))

Recipe
Serves: 8
Ingredients
For the biscuit base:
250g digestive biscuits
80g unsalted butter, melted
For the cheesecake batter:
800g cream cheese block, at room temperature
200g sour cream
175g castor sugar
1/2 tsp vanilla extract
zest of 1 lemon
40g plain flour, sifted
3 whole eggs + 2 egg yolks, at room temperature
50g passionfruit juice
For the passionfruit jelly:
140g passionfruit juice
30g castor sugar
7g gelatine leaf
For the mascarpone chantilly:
100g mascarpone cream
100g heavy cream
1/2 tsp vanilla extract
20g castor sugar
Method:
For the biscuit base:
Preheat oven to 160°C.
Grease a 10” round springform tin with butter and line with baking paper on the sides and the base. keep aside.
Blend the biscuits in a food processor to fine crumbs.
Add the melted butter and mix to combine.
Transfer the biscuit mix to the prepared baking tin and press it down to cover the base of the tin. Even out using a flat measuring cup or a glass.
Bake for 10-15mins or until light golden brown. Cool.
For the cheesecake:
Reduce the oven temperature to 150°C (fan-forced). Wrap the sides of the baking tin with aluminium foil.
Using a stand mixer fitted with a paddle attachment, beat the cream cheese & sour cream together for 8-10 mins until soft and lump free, scraping down the sides occasionally.
Add the sugar, plain flour, lemon zest and vanilla and beat until combined.
Combine the passionfruit juice with the whole eggs +yolk and with the mixer running on low, add into the cheesecake mix and mix until well combined. Do not over beat at this point.
Use a hand whisk and give the cheesecake batter a quick whisk to mix any uncombined bits & break up any lumps.
Strain the cheesecake batter and pour over the baked biscuit base. Tap lightly to remove any air bubbles.
Place a paper towel or clean chux at the base of a roasting pan. Place the baking tin on top of the towel and pour hot water into the roasting pan to upto 2 cm of the height of the baking tin.
Carefully place the roasting pan into the oven and bake for 30-40 mins or until the sides are set but the centre is slightly wobbly still. Start with 30 mins and add as needed.
Turn off the oven and let the cheesecake sit inside for 10-15 mins.
Remove from the oven. Carefully lift the baking tin from the water bath and let it cool to room temperature at the countertop. Refrigerate overnight.
For the passionfruit jelly:
Soak the gelatine leaf in cold water and bloom for 5-10 mins until soft. Squeeze the excess water and keep aside.
Cover the base of a 7” round ring with cling wrap and line with acetate. Place on a baking tray.
Heat the passionfruit juice and sugar together to 60°C. Add the bloomed gelatine and mix to melt completely.
Pour the jelly into the prepared ring and freeze until frozen. You can make this a day in advance.
For the mascarpone chantilly:
Whisk together all the ingredients to medium to stiff peaks. Refrigerate until use.
Assembly:
The next day, transfer the cheesecake to a plate.
Place the frozen passionfruit jelly in the centre of the cheesecake. Defrost in the fridge for an hour.
Pipe the mascarpone chantilly around the jelly. Use a hot knife to cut into neat slices & serve. Bon appetite!
Want to become a confident baker?
Apply for my signature baking mentorship program: ‘Bake It ‘Til You Make It’ to learn to bake like a pro and become confident in your skill set TODAY!
If you enjoyed that and tried it at home, please tag me at @myyummyspatula on Instagram so that I can see all your bakes! For more BTS stories, updates and fun, you can follow along here


